How to Hack Your EHR Scheduling System (For Counselors)
With Simple Practice raising its prices, overhead costs were getting a bit much for me about 6 months ago. I was in a season where I was not taking on many clients because symptoms from my rare chronic condition were acting up and I was preparing for my 3rd brain surgery (and writing my book, Facebook Ads for Counselors!).
I still wanted to offer online scheduling, but I didn’t want to pay an extra $30 dollars a month for it. A colleague and friend told me she had spent some time on the phone with Simple Practice customer support AND THEY TAUGHT HER HOW TO HACK THE SIMPLE PRACTICE ONLINE SCHEDULING SYSTEM! She was able to offer online scheduling and she didn’t pay for the top tier package with the scheduling widget. Sorry for the shouting. I got really excited upon learning this and letting you in on the news.
So here’s what you do.
Log in to your simple practice account.
Click on “Settings”.
Then click on “Client Portal” under the “Client
Communications” section.
A page will open with a link at the top. If you click on
that link, it will take you to your online scheduling page. Even for new
clients.
You can copy and paste this link to your website for new
clients to click. I put mine in button form because my website builder offers
that option and I prefer it. You could also type some text like “Request
Appointment” and make it a link, if your website builder doesn’t offer a ready-made
button option.
To set up your scheduling system so people can request the
services you wish to offer. Look below the link and fill out the information
accordingly. This is what mine looks like.
I always require credit card information for requests so I am protected against people filling out the requests on a whim and
blocking out time which could have gone to clients more likely to show up.
In all my years of taking online appointment requests only once have I been
stood up.
Once you have this section filled out, return to the “Settings” menu.
Select “Billing & Services” link under the “Billing” heading.
Click on the “Services” tab.
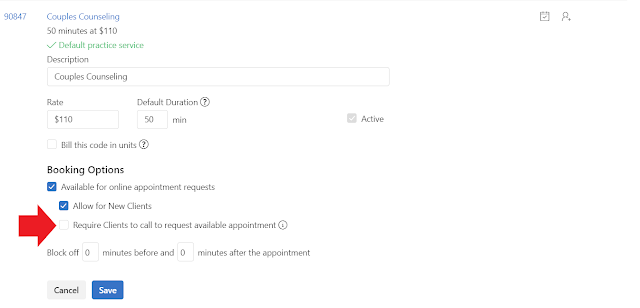
If the service you want to provide through your online scheduling system is not already added, please add it.
Otherwise, scroll down and check the necessary boxes for it to be available for online booking.
Do make sure you uncheck “require clients to call before scheduling appointment”. If you left it checked it would slow your appointment request flow down significantly. You can always opt to call them before you accept the request. You will have their information.

Once you have this section filled out click the “Settings” menu one more time. Go back to the “Client Portal”. You will need to click on the “Manage Availability” button on the top right side of the page.
Please adjust your availability and add the services for
which you would like new clients to be able to request.
Save everything. And whala! You have just saved $30 a month!
AND have a way for clients to schedule online!
I know this is only a step-by-step guide for how to hack your online scheduling system for Simple Practice. Perhaps similar steps might work for other EHR systems? Please let us know in the comments section!
As always, let me know if you have any question in the
comments below or email me at Amanda@FacebookAdsForCounselors.com
If you are ready to start filling your practice on just a $1
a day check out my E-learning guide Facebook Ads For Counselors.
#counselorshelpingcounselors #MarketingforCounselors #MarketingforTherapists #MentalHealthMarketing


.png)


Comments
Post a Comment